Choosing the Perfect Horseshoe Pit Setup for Your Backyard
Thinking about transforming your backyard into a go-to game zone? There’s no better way to start than with a horseshoe pit. Simple, classic, and endlessly fun, horseshoes is a game that brings people together across generations. But if you want smooth gameplay and fewer bounce-outs, building the right pit is key.
In this guide, you’ll learn exactly how to choose and build the perfect horseshoe pit setup for your backyard—from space planning and materials to product recommendations and pro tips. Whether you’re a casual weekend thrower or looking to host league-level games, we’ve got you covered.
🧱 Why You Need a Dedicated Horseshoe Pit
Sure, you can toss a horseshoe on a patch of grass—but that setup won’t give you consistent results or safety. A well-built horseshoe pit improves:
- Game quality (fewer bounce-outs and wobblers)
- Player safety (no slipping or tripping hazards)
- Durability (holds up over time and seasons)
- Aesthetic value (a beautiful backyard game space)
Plus, with the right gear and layout, your pit becomes a hangout hotspot for friends, family, or friendly rivalries.

📏 Regulation vs Casual: What Type of Pit Do You Want?
Before choosing your setup, consider your goals.
🏆 Regulation Pit
- Follows NHPA guidelines
- 40 feet between stakes (measured front to front)
- Stake height: 15 inches above ground, tilted back 12–15°
- Pit size: 43″ long x 31″ wide
- Used for league or serious play
🛋 Casual Backyard Pit
- Adjustable to fit your yard
- Common modifications:
-
- 30–35 ft stake distance
- Smaller pit size (36” x 30”)
- Shorter or removable stakes
- Great for families, BBQs, or youth games
Tip: A casual setup is perfect for most backyards—go with regulation if you plan on competitive matches or tournament practice.
📐 Step-by-Step Planning: Space, Surface & Layout
Let’s break it down.
1. Choose the Right Location
Look for:
- Flat ground
- Drainage (no pooling water)
- Open throwing lane (minimum 45 ft)
- Away from fragile windows or garden beds
If space is limited, use a portable horseshoe pit setup with temporary lines and movable stakes.
2. Decide on a Surface
Your pit should have a forgiving surface that absorbs shock. Most setups use:
- Sand – affordable, easy to maintain
- Clay – authentic, firm, used in tournaments
- Crushed stone/dirt blend – great alternative for casual pits
- Rubber mulch – clean and soft, though less traditional
Recommended: Start with coarse builder’s sand for a beginner-friendly, low-maintenance pit.
3. Mark Your Layout
Use string, tape, or stakes to outline:
- Distance between stake centers (40 ft or less)
- Pit dimensions (minimum 36″ x 30″)
- Pitching boxes (6 ft x 3 ft on both sides of each pit)
- Foul lines (37 ft for men, 27 ft for women/seniors)
4. Install Your Stakes
Use 1” diameter steel rods, about 36″ long, driven into the center of each pit. Leave 15 inches exposed, tilted slightly backward (12–15 degrees).
Need help? Try a stake installation kit or pre-angled anchors for quick setup.
🧰 Tools & Materials Checklist
Here’s what you’ll need for a DIY setup:
- Measuring tape or laser tool
- Shovel or garden spade
- Level
- Post-hole digger
- 2 steel stakes (regulation = 1″ diameter, 36″ long)
- Frame materials (treated wood, bricks, or timbers)
- Sand or clay for fill
- Landscape fabric (to reduce weeds)
- Optional: decorative stones, solar lights, foul line markers
Want a shortcut? Grab a horseshoe pit kit—many include everything pre-sized and ready to install.
🏗 Recommended Horseshoe Pit Kits & Gear
1. Bocce Supply Co. Complete Horseshoe Pit Kit
- Includes pressure-treated wood frames
- Comes with stakes, anchors, clay, and instructions
- Ideal for building two regulation pits
- Great for serious backyard players
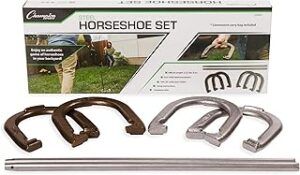
2. GoSports Backyard Horseshoe Game Set
- Casual, portable design with plastic pit borders
- Lightweight and great for parties or kids
- Includes horseshoes and carrying case
- Quick to set up and break down
Horseshoe Game Set
3. Custom Wood Pit Frames (Etsy or Local Builders)
- Handmade to your size specs
- Adds rustic charm to your yard
- Use with your own fill and stakes
- Upgrade your aesthetic and function
🛒 [Search for “horseshoe pit frames” on Etsy or Google]
🎨 Design Ideas to Personalize Your Pit
Make your setup uniquely yours with these creative additions:
- Painted pit borders in team colors or family crest
- Gravel walkways or stepping stones to each end
- Solar stake lights for night play
- Pergola or shade cover for comfort
- Custom scoreboards or chalk signs
Bonus: Add a garden bench, drink station, or lawn chairs for comfort and socializing.

🧑🏫 Pro Tips for Long-Term Success
- Level your pit surface regularly
- Add new sand or clay as needed (every 2–3 months)
- Use a tamper or rake to keep material firm
- Cover pits during rain to prevent erosion
- Rotate stakes occasionally to prevent wobble
Want to go next-level? Install a drain pipe below your pit or use weed-resistant liners under the surface.
👥 Family-Friendly Variations & Adjustments
Adjust your pit to match players’ age and skill:
- Shorten the stake distance for kids or seniors
- Use rubber or lightweight horseshoes
- Add a separate “kids pit” with soft scoring zones
- Paint “safe zones” for casual family games
Hosting a family reunion or party? Print fun scorecards or set up tournament brackets with teams.
🧠 FAQs About Backyard Horseshoe Pits
Q: Can I build a horseshoe pit without digging?
Yes! Try a raised frame pit with filled sand or clay. Use a wood or brick border and build on top of the ground.
Q: Do I need a permit or HOA approval?
In most areas, no. But check your local ordinances or HOA rules if you live in a managed community.
Q: What’s the best time of year to build a pit?
Spring and early summer are ideal—the ground is soft, the weather is mild, and it’s ready for peak play season.
🏁 Final Thoughts: A Backyard Pit That Brings People Together
A horseshoe pit isn’t just another DIY project—it’s an investment in connection, laughter, and competition. Done right, it becomes the heart of your backyard: a place where memories are made, stories are told, and ringers are celebrated with cheers.
Whether you’re building a full-blown regulation court or a cozy pit for Sunday pitching, the right setup starts with smart planning—and the gear that fits your goals.
So measure your space, grab your stakes, and build something your whole crew will love.
🔜 Up Next: Top Accessories Every Horseshoe Player Needs (That Most Forget)
From backstops and foul line markers to scoreboards and carrying kits, our next article will break down the best gear to upgrade your gameplay and boost your pit’s wow factor.
Hi there, and thanks for stopping by! My name is Larry, and I’m the voice behind PlayingHorseshoes.com. I love the game and have been playing since I was a kid. I started this blog because I am passionate about the sport, and with all the technology, I hope the sport doesn’t die. I plan to do my part to keep it going for me and my brother’s sake. Thanks for stopping by. Feel free to subscribe and comment. Thank You!