The Ultimate Guide to Setting Up a Horseshoe Game at Home
Nothing brings people together like a friendly backyard game—and few games are as timeless, satisfying, and simple as horseshoe pitching.
From casual BBQ showdowns to competitive ringer showdowns, a well-built horseshoe setup at home can become the highlight of your outdoor space. But how exactly do you go about building one? What are the dimensions, materials, and best practices for setup?
This comprehensive guide answers all your questions. Whether you’re a complete beginner or a weekend warrior looking to upgrade your current setup, here’s everything you need to build the ultimate horseshoe game at home—from pitch dimensions and pit design to placement tips and court accessories.
Let’s get throwing.
🧱 What Is a Horseshoe Pitch?
Before we dive into tools and dimensions, let’s clear up what we’re building.
A horseshoe pitch (or court) is the designated area for playing a standard horseshoe game. It includes:
- Two pits filled with sand or clay
- A pair of metal stakes, one at each end
- Flat pitching lanes or boxes on either side of each pit
When properly installed, it becomes a regulation or recreational space for players to throw horseshoes and compete fairly.
📏 Official Horseshoe Court Dimensions
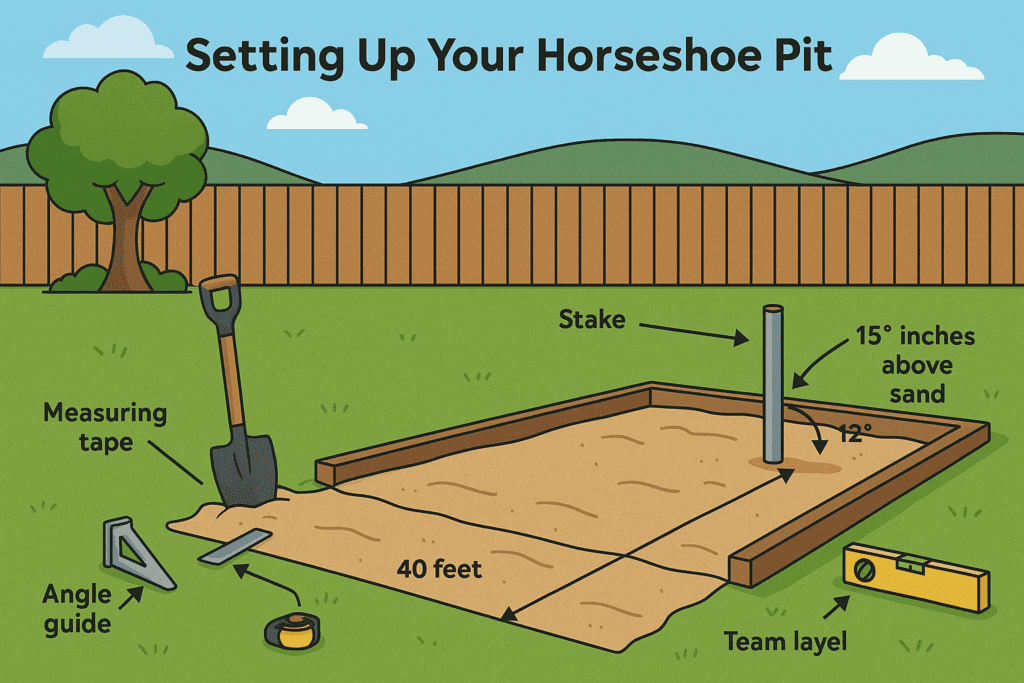
If you’re aiming for a regulation-style build, here are the specs you’ll want to follow—based on NHPA (National Horseshoe Pitchers Association) standards.
➤ Key Measurements:
- Distance between stakes: 40 feet (measured from front of one stake to front of the other)
- Stake height: 15 inches above pit surface
- Stake angle: Leaned backward at a 12–15 degree angle
- Pit dimensions: 43” long by 31” wide
- Pitching box: 6 feet wide x 3 feet deep (on each side of pit)
Backyard Tip: Don’t worry if you can’t fit a full 40 feet—adjust as needed. A 30-foot or even 25-foot pitch still delivers plenty of fun.
🏡 Finding the Best Location in Your Yard
🧭 Consider:
- Flat terrain for accurate gameplay
- Drainage to avoid water pooling in pits
- Shaded areas to keep players cool
- Clear surroundings for throwing space and safe play
Avoid areas near windows or fragile landscaping—you’ll thank us when someone overshoots!
🔨 Tools & Materials for a DIY Horseshoe Pitch
Setting up a horseshoe court is totally DIY-friendly. Here’s what you’ll need.
➤ Tools:
- Shovel or garden spade
- Measuring tape
- Level
- Post-hole digger (optional)
- Hammer or mallet
- Rake
➤ Materials:
- Two steel stakes (1” diameter, 36” long)
- Sand, clay, or blended soil (for pit fill)
- Treated wood, bricks, or landscaping timber (to frame your pit)
- Optional: Landscape fabric (to prevent weeds)
⚙️ Step-by-Step Guide: How to Set Up a Horseshoe Game at Home
Let’s walk through building your very own backyard horseshoe court—from scratch.
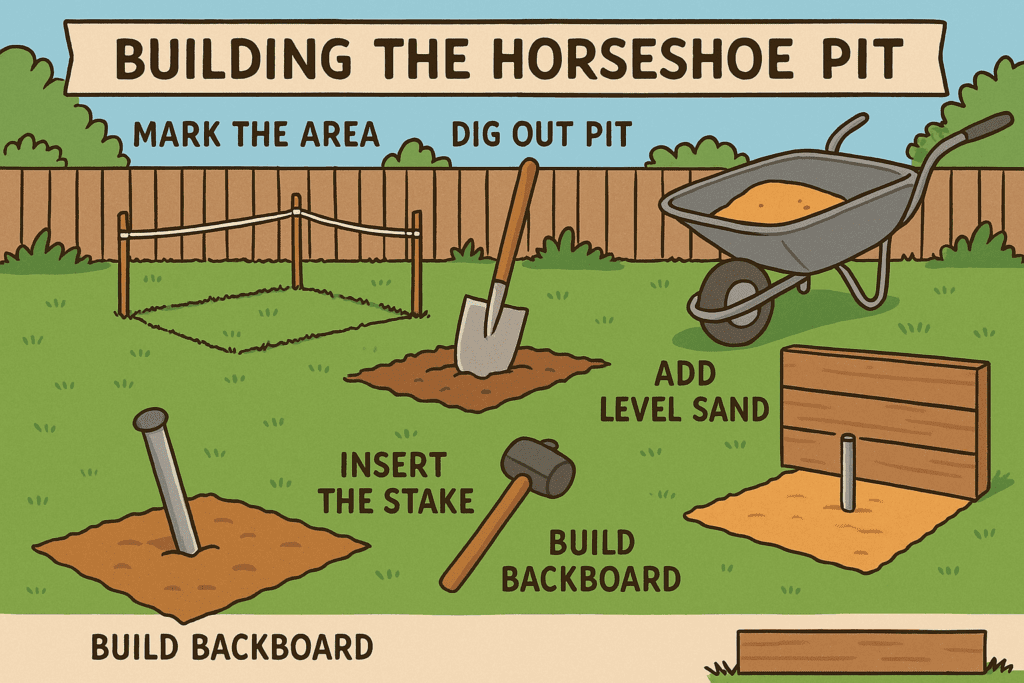
🪧 Step 1: Mark Out Your Layout
Using string or landscape marking spray, map out two pits with 40 feet between them. Measure from the front of each stake location, not center to center.
🧱 Step 2: Build the Pit Frame
Each pit should be roughly 43 inches long and 31 inches wide. Use:
- Pressure-treated wood
- Landscaping bricks
- Recycled railroad ties
Frame out each pit area and make sure they’re level with the ground.
Pro Tip: Slightly slope the pit bottom for water runoff, or install drainage gravel below.
🏖 Step 3: Fill with Pit Material
Clay is used in professional courts because it holds moisture and reduces bounce. For home play:
- Sand is more common, easier to maintain
- Clay-sand mix gives a more authentic feel
- Fine dirt or soil blends work if compacted well
Fill your frame with 4–6 inches of your chosen material and level it off.
📍 Step 4: Install the Stakes
This is the core of the setup. Use:
- 1” diameter steel rods, 36” long
- Drive them into the center of each pit at a 12–15° backward angle
- Leave 15 inches exposed above the playing surface
Check alignment with a level and measuring tape. Stakes should be directly aligned, facing each other.
⚖️ Step 5: Level, Adjust, and Test
Do a few test throws:
- Make sure the pit material is soft enough to absorb the impact
- Ensure stakes don’t wobble or lean too much
- Walk the area to check for safety or setup issues
This is a great time to rake, water clay if needed, and add foul line markers with paint, chalk, or boards.
🔄 Optional Upgrades and Customizations
Want to take your backyard horseshoe pitch from functional to fantastic? Here are some popular additions:
🧩 Add Boundary Boards or Backstops
These help catch stray throws and keep your pits tidy.
- Wooden or rubber backstops behind the stake
- Side bumpers or short fences
- Decorative borders with gravel or mulch
💡 Lighting for Night Games
- Solar or LED landscape lights
- String lights for ambiance
- Motion-activated work lights for visibility
🪑 Comfort & Spectator Seating
- Folding chairs or benches nearby
- Small side tables for drinks and scorecards
- Shade umbrellas or pop-up canopies
🎵 Sound & Ambiance
- Add Bluetooth speakers for background music
- Use themed decor (patriotic, sports team, rustic)
🧠 Game Variations to Keep It Fun
Now that your court is ready, let’s keep your guests entertained. Try these variations:
1. Standard Game
- Pitch from 40 feet (or adjusted distance)
- 2 players take turns throwing two shoes each
- First to 21 or 40 points wins
2. Round Robin
- Great for tournaments
- Each player faces every other player once
3. King of the Pit
- Winner stays; challengers rotate in
- Track win streaks and post leaderboards
4. Ringer Challenge
- Play timed rounds and score only ringers
- Ideal for advanced players or bragging rights
👨👩👧 Horseshoe Pitching for All Ages
Make it a family-friendly setup by adjusting court elements:
For Kids:
- Use plastic or rubber horseshoes
- Shorten the throwing distance to 20 feet or less
- Replace stakes with soft poles or cones
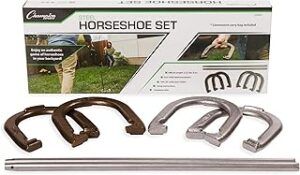
Horseshoe Game Set
For Seniors:
- Use lighter shoes (2 lbs or under)
- Add benches between pits
- Allow shorter foul lines or reduce the number of rounds
🧽 Maintenance Tips to Keep Your Pit Looking Sharp
Maintaining your horseshoe court keeps gameplay smooth and equipment lasting longer.
Weekly:
- Rake and level the pit surface
- Check stake stability
- Remove debris or weeds
Monthly:
- Top off pit fill as needed
- Repaint foul lines or touch up wood
- Inspect for erosion or damage
Seasonal:
- Cover pits in heavy rain or snow
- Use tarps, lids, or homemade covers
- Drain water buildup or use trenching around pit borders
Pro Tip: Store your horseshoes in a dry, shaded area to prevent rust and wear.
📌 Horseshoe Pitch Specs at a Glance (Quick Reference)
- Stake Distance: 40 feet (standard), 30–35 feet for casual
- Stake Height: 15 inches above pit surface
- Pit Size: 43” L x 31” W
- Stake Angle: 12–15° backward
- Pitching Box: 6’ x 3’ on both sides of each pit
- Materials: Sand, clay, steel stakes, treated wood
🏁 Final Thoughts: Your Backyard, Your Tradition
Setting up a horseshoe game at home isn’t just about building a court—it’s about building memories. It’s a simple, satisfying project that brings people together for laughs, challenges, and maybe a little friendly trash talk.
And the best part? Once your pitch is in place, you’ve got an excuse to step outside, grab a cold drink, and let the ringers fly.
Whether you’re going full regulation or just carving out a fun space near the grill, horseshoe pitching turns any backyard into the ultimate hangout zone.
📣 Ready to Build Your Pit?
Have you already built your own court? Thinking of starting this weekend? Share your story or photos in the comments—we’d love to feature backyard setups from our community!
Hi there, and thanks for stopping by! My name is Larry, and I’m the voice behind PlayingHorseshoes.com I love the game and have been playing since I was a kid. I started this blog because I am passionate about the sport, and with all the technology, I hope the sport don’t die. I plan to do my part to keep it going for me and my brother’s sake. Thanks for stopping by, feel free to subscribe and comment. Thank You!