
How To Choose The Right Pitching Horseshoes For Beginners (And Master the Basics)
If you’re new to the world of horseshoe pitching, welcome! It’s more than just a classic backyard game—it’s a skillful, strategic sport that’s equal parts precision and patience. But here’s the thing: your success starts before you ever take your first swing. And that begins with choosing the right pitching horseshoes for beginners.
In this guide, we’re not just talking about tossing iron. We’re visualizing success, practicing with purpose, and learning how to turn a simple backyard setup into a confidence-boosting, ringer-landing experience. Whether you’re practicing for fun, for competition, or just building your confidence around the pit, this article breaks it all down—gear, form, scoring, and beginner mistakes to avoid.
🧲 Why Choosing the Right Horseshoes Matters for Beginners
Let’s be real—picking up the wrong horseshoe is like learning to write with the wrong hand. You can do it, but it’s going to be harder than it needs to be.
Choosing beginner-friendly pitching horseshoes helps you:
- Improve control and accuracy
- Reduce hand fatigue during longer sessions
- Build muscle memory with consistent throws
- Stay within the proper league weight ranges
Lightweight horseshoes (between 1.9 to 2.1 kg) are ideal for beginners. They provide enough weight for proper swing mechanics without being too bulky or difficult to handle.

🎯 Understanding Horseshoe Pitching Basics
Before we get into gear, let’s make sure you’ve got the fundamentals down.
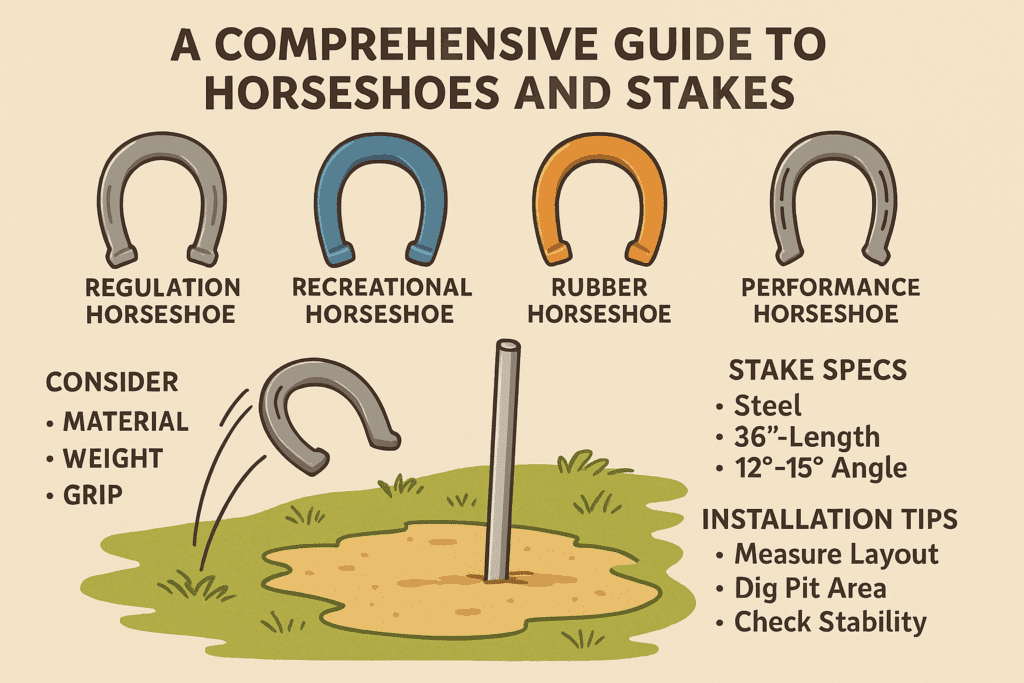
📏 What Is the Distance Between Horseshoes for Beginners?
- Official distance: 40 feet (12.2 meters) between stakes.
- For juniors or casual play: 30 feet is acceptable for shorter arms or beginner skill levels.
🧠 What Are the Rules for Pitching Horseshoes?
Here’s a simplified breakdown:
- Each player pitches two horseshoes per turn.
- The goal: land a “ringer” (a horseshoe that encircles the stake) or get your horseshoe closer than your opponent’s.
- Scoring:
- Ringer = 3 points
- Closest shoe within 6 inches = 1 point (unless beaten by a ringer)
- Only one player scores per inning (no shared points)
🔁 What Is the Maximum Score in a Game of Horseshoes?
- Standard games go to 40 points, or until a player scores 21 points in some backyard formats.
- League play may vary, but first to 40 with at least a two-point lead is common.
🧍♂️ How to Pitch Horseshoes: Beginner-Friendly Techniques
🌀 Horseshoe Pitching Techniques
There are a few different styles, but two of the most common are:
- Flip Technique: Horseshoe flips once end-over-end. Easier for kids and casual players.
- 1 ¼ Turn or ¾ Turn: Horseshoe rotates sideways in the air for greater accuracy.
- Reverse ¾ Turn: A rare technique where the shoe spins in reverse—best for advanced throwers.
🏹 How To Throw a Ringer Every Time (Almost)
Let’s keep it real—it’s hard to land a ringer every throw, but here’s a method that gets you close:
- Grip: Hold the horseshoe with the open end pointing forward. Use a firm but relaxed grip.
- Stance: Feet shoulder-width apart. Step with the opposite foot as you swing.
- Release: Let go when your arm is at waist height. Allow a slight wrist flick for spin.
- Follow-through: Your arm should continue naturally toward the stake.
💡 Tip: Watch horseshoe pitching slow motion videos to see exactly how professionals time their release and rotation.

🧲 How To Choose the Right Pitching Horseshoes for Beginners
🧑🏫 Key Features to Look For:
- Weight: Stay between 1.9–2.1 kg for beginners.
- Balance: Horseshoes with even distribution improve flight control.
- Shape: Rounded edges and longer tips are more forgiving for new players.
- Material: Ductile iron or forged steel for durability (don’t go plastic unless it’s a kid set).
- Grip Coating: Some beginner-friendly models include a powder-coated grip or texture for comfort.
✅ Recommended Pitching Horseshoes for Beginners
Here are a few top picks trusted by players and beginners alike:
1. St. Pierre American Professional Series Horseshoe Set
- Weight: Regulation (around 2 kg)
- Finish: Powder-coated for easy grip
- Great for casual games or those wanting a pro feel early on
2. Challenger Professional Pitching Horseshoe Set
- Classic design with balanced feel
- Designed for official play and backyard practice
- Long tips and smooth rotation for beginner-friendly throws
3. Pro EZ Flip Horseshoe Set
- Optimized for consistent flip technique
- Balanced for beginner arms and ideal for learning proper release timing
- Bright colors improve stake visibility
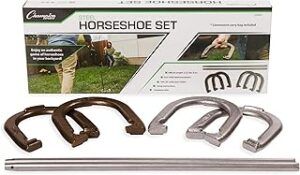
Horseshoe Game Set
🧠 Pro Tip: Visualize Before You Pitch
This isn’t just woo-woo stuff—visualization works.
Before each pitch:
- Picture the horseshoe flying in a clean arc
- Imagine it landing with a soft “clang” on the stake
- Breathe out on the release to relax tension
That mental rehearsal sharpens focus, improves consistency, and builds confidence.
🏋️♀️ How to Practice Like a Pro (Even If You’re Just Starting Out)
Here are a few beginner drills:
- Target Circle Drill: Draw a circle around the stake and aim for landing inside it consistently.
- One-Step Drill: Pitch with just one step forward to isolate your arm motion.
- Reverse ¾ Turn Practice: If you’re feeling bold, try spinning the shoe backward for fun and see what sticks.
🧠 Frequently Asked Questions
Q: How to score horseshoes for beginners?
A: 3 points for a ringer, 1 point for closest shoe within 6 inches. Only the best thrower per round scores.
Q: What is the best way to pitch horseshoes?
A: Start with the flip technique, focus on balance and consistent release. Gradually try ¾ or reverse ¾ turns for control and spin.
Q: What is the distance between horseshoes for beginners?
A: Officially 40 feet, but beginners can start at 30 feet for a more approachable game.
Q: What are the rules for pitching horseshoes?
A: Take turns throwing two horseshoes each. Score based on ringers or proximity to the stake. Most games go to 21 or 40 points.
Q: How to throw a ¾ turn horseshoe?
A: Grip the horseshoe at the tip, angle your release slightly to the side, and allow the shoe to spin horizontally in the air.

🛒 Final Thoughts + What You Need to Get Started
Learning how to choose the right pitching horseshoes as a beginner is one of the smartest investments you can make in your game. It’s not just about playing—it’s about building muscle memory, developing accuracy, and having fun with friends and family while sharpening your skills.
🎯 Recommended Starter Gear Checklist:
- Beginner-friendly horseshoe set (like the EZ Flip or Challenger)
- Lightweight, regulation stake set
- Sand or clay pit (or a backyard version with wood borders)
- Tape measure to mark throwing distance
- Optional: Horseshoe carrying case for travel
👟 Call-To-Action: Step Up to the Stake
Now that you know how to choose the right pitching horseshoes, it’s time to put that knowledge into action. Pick your gear, set up your pit, and start throwing. Don’t aim for perfection—aim for progress. Whether you’re aiming for your first ringer or just having fun with friends, the right tools and mindset can transform your game.
👉 Ready to start landing ringers? Explore top-rated pitching horseshoes and upgrade your game today.
Hi there, and thanks for stopping by! My name is Larry, and I’m the voice behind PlayingHorseshoes.com I love the game and have been playing since I was a kid. I started this blog because I am passionate about the sport, and with all the technology, I hope the sport don’t die. I plan to do my part to keep it going for me and my brother’s sake. Thanks for stopping by, feel free to subscribe and comment. Thank You!
This was such an informative and well-laid-out guide—thank you for making horseshoe pitching feel approachable for beginners. I appreciated the clear breakdown of not only the equipment but also the throwing techniques and scoring basics.
A couple of questions came to mind as I read:
For someone with smaller hands or less grip strength, do you recommend staying closer to the 1.9 kg range, or are there any specific models designed with ergonomic grips to help?
Have you found that certain materials (like forged steel vs. ductile iron) make a noticeable difference in how the horseshoe flies or how much vibration you feel on release?
I used to play casually with friends in the backyard, but we never paid much attention to weight or balance—just grabbed whatever horseshoe was around. I can definitely see how a well-balanced, properly weighted horseshoe would make a big difference in consistency and control, especially if you’re trying to learn the ¾ turn technique.
Thanks again for such a detailed beginner’s guide. I’m inspired to set up a more official pit and finally work on my form instead of just hoping for lucky ringers!
Thanks for your comment, I would not get caught up with the exact weights or materials. The main thing is to play with shoes you feel comfortable with and Have Fun.. 1.9 kg is a perfect with for beginners and forged steel horseshoes Set up that pit and have Fun!.
Great guide for beginners—thank you! I’m curious, though: how important is it to stick with one specific throwing technique (like the flip or ¾ turn) when starting out? Should beginners try multiple styles to see what feels natural, or focus on mastering one from the start for better consistency? Personally, as a beginner I think trying a few different techniques would be best to see what’s comfortable.
Thanks for your comment. Yes, I think beginners should try different styles to see what’s comfortable, which produces the most ringers. Lol..
Thank you for a very insightful article for specifically beginner horseshoe throwers, Larry. For a beginner, isn’t it probably a good idea to try many different grips and styles of throwing a horseshoe? This would give the beginner what grip and style feels comfortable. Feeling comfortable in throwing horseshoes would bring about favorable results. Also, one question: I have played some horseshoes with a friend where we counted what we called a “leaner” for 2 points. Is this an official rule or just a “backyard” rule? Once again, thank you for a very educational article about horseshoes for beginners.
Best wishes,
Kent
Thanks for your comment! Its better to try different styles of throw to see what you are good at. Me I love the “Flip.” As for scoring, you can make your own “backyard rule”. Playing with my brother and friends, we had ringers at 5, leaners at 3, and closest to the pin at 1.
Ok – Well this was something I never expected to learn today — who knew there was so much nuance in choosing the right pitching horseshoes? From weight and grip to flip vs. turn techniques, it’s like discovering a whole subculture of backyard precision I never knew existed.
I have tossed a horse-shoe or 2 in my time, but clearly not with the right gear or form whatsoever! Might be time to upgrade from “random rusty horseshoe” to something that actually lands a ringer.
But in all seriousness this was a good read @larry – thank you.
MarkA
Thanks for your comment, and get back out there and throw some more ringers!
This is a fantastic, beginner-friendly guide that really breaks down everything someone new to horseshoe pitching needs to know. From choosing the right equipment to understanding the scoring and basic throwing techniques, it’s all here in a clear, engaging format. I especially appreciate the focus on why beginner-specific horseshoes matter—it’s so true that starting with the right gear makes learning much easier and more enjoyable. The step-by-step technique section is also super helpful, especially for those of us who learn better by visualizing each movement. I also liked the tips on weight selection and proper distances; small details like that can make a big difference in performance and confidence. Thanks for making this classic game more approachable for newcomers—definitely bookmarking this for future practice sessions!
Thanks for your comment. You are welcome. Get out there and start pitching!
Larry